Due to their effectiveness, simplicity of operation, and affordability, scooters are becoming increasingly common. To maintain the best performance and safety, they need routine maintenance, just like any other type of vehicle. Brake adjustment is among the most crucial elements of scooter maintenance. This article will explain how to adjust front brakes on scooter and various problems you can run into.
Common issues with the front brakes of an electric scooter
Like any other part of an electric scooter, brakes can encounter many problems. Brakes, as stated above, are highly useful and are, at times, life-saving. Knowing where a problem can arise in your vehicle’s brakes can help you keep an eye out for them and fix them should they arise. Some of the common problems include:
Worn brake pads
Much like the brake pads on any other vehicle, the brake pads on an electric scooter can degrade over time, reducing stopping force and raising the risk of accidents.
Brake cables that are too loose or worn out
It can reduce the braking system’s efficacy.
Faulty brake calipers
Brake calipers push the brake pads against the rotor to slow down the scooter. The brakes may not function correctly if they develop problems.
Bubbles
An electric scooter’s brakes may experience mushy or sluggish stopping when air bubbles develop in the brake lines.
Brakes that have overheated
If the brakes are applied too forcefully or frequently, they may overheat, impairing braking power and perhaps accelerating brake pad wear.
Dirty or contaminated brake pads
Dirt or oil on the brake pads can diminish their efficacy and cause the brakes to make noise or screech.
Inadequate brake component adjustment
If the brakes are not tuned correctly, they may not function as they should and may put the rider in danger.

Fixing the issues with Front brakes on electric scooter
Checking the Brake pads
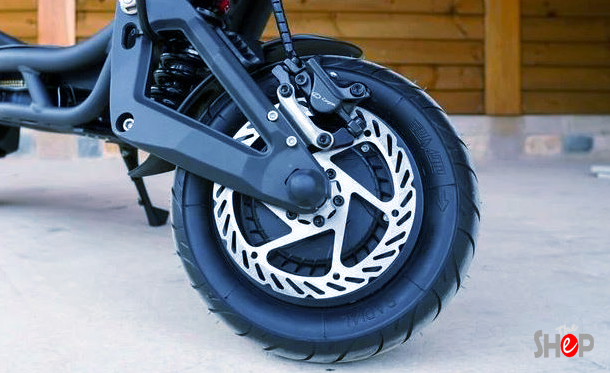
In disc-brake systems, the brake pads are the friction material that the caliper presses up against the rotating disc, or rotor, to stop the vehicle. The pads in drum brakes, however, are referred to as shoes.
Brake pads must be replaced as part of an automobile’s routine maintenance since they are subject to extreme heat and friction. The vehicle’s design and the way it is driven affect how long they last.
Examining the brake pads is the first step in changing a scooter’s front brakes. The scooter’s small, replaceable brake pads contact the rotor or drum to slow or stop it. Brake pads may wear out over time and require replacement. You can check the brakes by following techniques.
- Find the scooter’s front wheel’s braking caliper.
- The two bolts holding the caliper to the fork must be removed.
- Remove the brake pads and caliper with caution.
- Examine the brake pads for symptoms of wear, such as inconsistency or thinness. The brake pads must be replaced if they are worn.

Adjusting the lever’
You can adjust the brake lever once you have examined the brake pads and changed them as necessary. The component that engages the brakes when pulled is the brake lever. A loose or tight brake lever might impact the effectiveness of the brakes. The brake lever can be adjusted as follows:
- Find the brake lever, located on the handlebars
- Use a wrench or Allen key to remove the bolt holding the brake lever to the handlebar.
- Make the brake lever comfortable for your hand and arm by adjusting the position. Check to make sure it is not too tight or too loose.
- To keep the brake lever in place, tighten the bolt.

Adjusting the cable
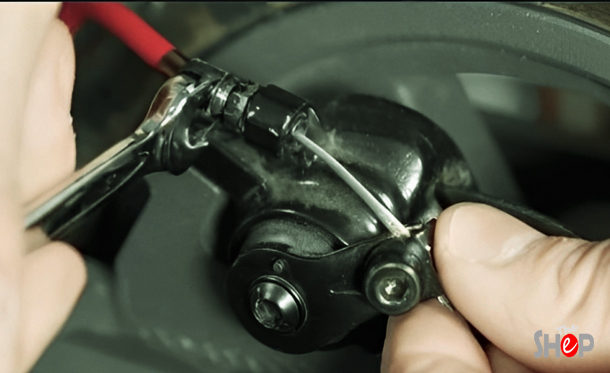
The brake cable must then be adjusted to complete the scooter’s front brake adjustment. To guarantee that the brakes are quick and effective, the brake cable must be properly set, which joins the brake lever to the brake caliper. The brake cable can be adjusted as follows:
- Find the scooter’s brake cable. From the brake lever to the brake caliper, it will extend.
- Use a wrench or an Allen key to remove the bolt holding the brake wire to the brake lever.
- Ensure there is no slack in the brake cable; pull it tight by hand.
- Tighten the bolt to connect the brake wire to the brake lever.
- On the brake caliper, find the brake cable adjuster. It will be close to the caliper area where the brake cable connects.
- To tighten or loosen the brake cable, turn the adjuster in either a clockwise or anticlockwise direction. Make sure the cable is adjusted such that it has a little bit of extra slack.
- To check if the brakes are sensitive enough and effective, test the brake lever.
Preventing braking issues
As the saying goes, “Prevention is better than cure” you can prevent your brakes from falling victim to the issues mentioned earlier by simply being mindful of a few things.
- Regularly replace your brake pads, and if you are using your scooter more times than usual, keep an eye on the brake pads. This ensures that the brake pads don’t fail you if they get too worn out, as they are used more than usual.
- Always check the braking cable (if your scooter has one) before going on a trip, and if it feels loose, then tighten it immediately. A loose cable can transform into a failed brake quickly.
- You should periodically check your scooter calipers to ensure they don’t develop any problems. Similarly, if your scooter has disk brakes, then be sure to get the brake fluid checked for bubbles as well
- If the brakes seem unadjusted, then by following the steps mentioned above, you can adjust them yourself.
- Lastly, keep your vehicle clean and use your scooter brakes gently at all times.
Final words:
Overall, preventing and resolving braking issues is fairly simple but requires regular checks by the user. Furthermore, adjusting the brakes yourself is no difficult task. If the steps mentioned above are followed, anybody can adjust their vehicle’s brakes without a problem. Remember, braking system is your defense and you have to maintain it properly for your safety.
Arnold A. Jones: Your go-to source for electric scooters, hoverboards, and skateboards! Riding enthusiast and expert sharing tips, trends, and insights for riders of all levels. Stay in the know with Arnold’s expertise.


Leave a Reply